I never saw a wild thing
sorry for itself.
A small bird will drop frozen dead from a bough
without ever having felt sorry for itself.
Author: byun1114
-
Self-pity by D.H. Lawrence
-
NAVIX CLI 모드
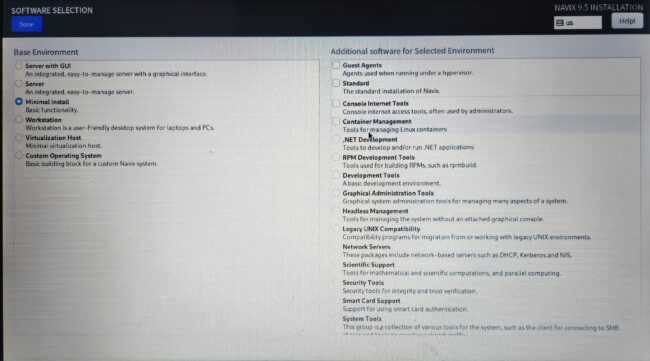
CLI 모드를 무조건적으로 선호하지 않는다. 그런데 구형 노트북에 설치하면 GUI 화면이 보이지 않는다. 그래서 CLI 모드 사용하는 방법을 찾아야 했다.
내가 모든 모드를 다 확인할 필요가 없어서 4번째 항목부터는 해보지 않았다. CLI 모드로 사용하기 위해서는 3번째 Minimal install 로 해야한다.
-
cloudflared proxy-dns #2
Docker 환경에서 사용하고 있었다. 잘 되는 것 같기는 한데, 컨테이너에 접속을 해보면 이상하게 잘 죽는 경우가 있다. 그래서 호스트에서 서비스로 운영하고 있다. Cloudflare에서 설정 과정을 잘 설명하고 있다. 단 한 부분만 빼고. 그래서 여기에 기록해 둔다.
 Create a locally-managed tunnel (CLI) · Cloudflare Zero Trust docsFollow this step-by-step guide to get your first tunnel up and running using the CLI.
이번에는 Navix가 설치된 노트북에 설치한다. 그래서 평소와 달리 red hat 부분을 참고해서 설치한다.
curl -fsSL https://pkg.cloudflare.com/cloudflared-ascii.repo | sudo tee /etc/yum.repos.d/cloudflared.repoyum에서 dnf로 바뀌었다고 하는데.. 적어도 다음 과정에서 dnf 를 입력해도 잘 되는 것 같다.
sudo yum update && sudo yum install cloudflared서비스 형태로 동작하게 하기 위해서 다음의 내용을 참고한다. 이상하게 copy 가 잘 안되어서 손으로 일일이 입력했다.
 Connect to 1.1.1.1 using DoH clients · Cloudflare 1.1.1.1 docsThere are several DoH clients you can use to connect to 1.1.1.1.
sudo nano /etc/systemd/system/cloudflared-proxy-dns.service[Unit] Description=DNS over HTTPS Wants=network-online.target nss-lookup.target Before=nss-lookup.target [Service] AmbientCapabilities=CAP_NET_BIND_SERVICE CapabilityBoundingSet=CAP_NET_BIND_SERVICE DynamicUser=yes ExecStart=/usr/local/bin/cloudflared proxy-dns --upstream https://1.1.1.1/dns-query --upstream https://1.0.0.1/dns-query --address 0.0.0.0 [Install] WantedBy=multi-user.target다음 과정으로 서비스를 활성화시킨다.
sudo systemctl enable --now cloudflared-proxy-dns